
Digital Market Help
Overview
Digital Market is like many other paid downloads manager component but what makes stand out from the rest is the following features:
• Possibility to upload documents from front-end. Any user (depending on permissions set by administrator) is able to upload a file, even guests, and set a price for it. Any other user who tries to download the file will be asked for payment. This means that you can define what user groups are able to upload and sell files on your site.
• Definition of permissions on actions for managing the component based on ACL. In other words you can specify who does what. The permissions you can grant include download a file, upload, change price for a file, change currency of the price, download file without paying or use HTML editor for setting the description of a file.
Basically you can use Digital Market as a regular paid downloads manager to sell your own files but you can also use it to allow other users to sell their files. In this case you, as administrator, can specify the percent you want for the sales of the files. All the money paid by users will go directly to your PayPal account, so you will have to pay that money to them when they reclaim it.
Setting up.
First thing to do is to download and install Digital Market. Then in Joomla Component menu click “Digital Market”. You should now be seeing the documents page.

If this is the first time you install this component you shouldn´t see any documents and only two buttons in the toolbar, “New” and “Options”. Click “Options” to set up. You should see the configuration modal window.

There specify the PayPal account where you want to receive the money of payments and set “Test mode” or not if you want to use Paypal sandbox or want to receive real money. If you set “Test mode” you can also set “Use Paypal Simulator” and the payments will be simulated locally, you won´t need to connect to Paypal.
Now click on “Permissions”.
Here you can set the permission to each user groups. It is important that you grant download permission to at least one user group or then the component will make no sense. If you deny downloading to public users and allow to registered users then registering will be necessary to download.
You can also specify here what users groups are allowed to download. And it may be that you don´t want users to set the price they want to the files they upload, then you can deny permission to change price and when someone uploads he will have to set the default price defined by the administrator.
Categories
This section works just like categories in Joomla. In fact it uses the Categories Manager Joomla component, so you should have much trouble with it. It basically allows you to create unlimited-level nested categories. In this pictures I created three nested categories, Science, Biology and Zoology. Biology is a subcategory of Science and Zoology a subcategory of Biology.

There isn't much to explain about this, to create a category just click the "new" button, and to edit one click the edit button, and so the rest of the buttons work alike other Joomla components.
There is, however, something that should be explain, and it is the permissions. This feature is also available for Joomla categories in content articles. For every category you can set a different permissions set overriding the permissions specified in the component (when you clicked the "options" button). 
With this feature you can disabled uploading for all users in all categories but enable it for registered users in the Zoology category. This way you will force users to upload only to that category.
Documents.

Here is where you manage all uploaded files or documents. You can upload, edit and delete documents. The attributes for documents are:
Title: Just the title of the document.
Price: The price that users will have to pay for downloading it.
Currency: The currency that applies to the price.
Status: Status of document, published or not published.
Category: The category the document belongs to. I have three categories, so I can choose Science, Biology or Zoology.
Attachment: This is the most important field. It is the file that will be provided when download is requested on document.
Thumbnail: This field is optional. It is an image that you can use to give a preview of your file. On front-end it will seen as a button that will allow you to see the picture in a modal window.
Demo file: This is also optional. You can use it to provide a demo of the file to download for free.
Demo text: If your attachment is a pdf file, for example, in this field you write the first page of the pdf document. This way users can read a part of the document before paying for it.
Description: In this field you will provide a description of the document. If you have the right access level you can use an HTML editor.
Front-end Settings.
If you set a paypal account and uploaded some documents then you should be able to start selling your files. But if granted permission for users to upload there are a few more things that you should look at. Please, click the "Options" button and check the "Front-end settings" tab.

There you have the following settings:
Default price: This a price that will be applied to a document uploaded by a user. In case user doesn't have permission to change price this will be the price assigned.
Default currency: Similar to the previous setting, it is the default currency in case the user who is uploading doesn't the right to change currency.
Manager percent: This value is the percent of the sale that belongs to the manager (or administrator, in this case, you). When a sale is made the money goes directly to your Paypal account but you will have to pay the owner of the file the rest of the money. For example: manager percent is 10%, user X uploads a file and sets a price of 100 usd, then user Y pays the required money for the file, then 100 usd goes to manager Paypal account, who in time will have to pay 90 usd to user X.
Minimum price: This is the lowest amount for a price a front-end user can assign to a file.
Maximum price: This is the highest amount of money a front-end user can assign as price to a file.
Allowed extensions: These are the extensions for files that users are allowed to upload. This settings is for security reasons. Make sure you don't include exe or php extensions.
Notification Settings.

You can specify notifications to be sent every time a file is sold. Click the "Notification Options" tab and you will be able to adjust these settings:
Notification E-mail: This is the e-mail where you will receive message about salesment.
Admin Notification subject: This would be the subject of the message.
Admin Notification Body: This is the body for the message.
Client Notification subject: This is the subject of the message that is sent to the user who has bought a download.
Client Notification Body: This would be the body of the message.
You can use different text replacement tags in subjects as well as in bodies of the messages. The following are the ones you can use:
- {amount}: The amount of money that was paid for the file.
- {fee}: The fee collected by Paypal for the payment.
- {tax}: Tax applied.
- {currency}: Currency for the amount of money paid.
- {transaction}: Id of Paypal transaction.
- {payer_email}: E-mail (or Paypal account) of user who paid.
- {download_link}: The download link that can be used by the buyer to access the file at a later moment. If user was logged in when doing the payment this link will not be needed.
- {document}: The title of the document sold.
- {max_downloads}: The maximum number of downloads of this document allowed to the user.
- {expiration_date}: The date when the right to download the files expires for the user.
- {user}: The name of the user who paid.
Front-end
So far you have completed the basic settings for the component to work in back-end. All that is left is to create a menu item so front-end users can have access. Create a menu item and select type as Digital Market X - Category List.

Set a title for the menu and select the category to show, for example science.
When you click on that menu item in Front-End you would see something like this:

In this view you can see the title of the category and its description. Also the list of sub-categories and the list of documents in this category. Notice that there is also a link to upload a document, it will be shown only if you have the right to upload in this category.
If you take a look at the upload view you will see that the fields are the same as in back-end.

You will also need to create a menu item to the profile. This is where users who want to sell files will specify their Paypal account and claim any money they have earned.

Testing.
Now, let's say that you have set up a demo site following this tutorial, following these steps.
- Set a Paypal account, any account This email address is being protected from spambots. You need JavaScript enabled to view it.
- Set test mode and use paypal simulator options.
- Enable download for all users, including guests.
- Enable upload for registered users only in Zoology category.
- Create a registered user named Peter.
Now let's simulate how the component works.
- User Peter logs into site.
- Peter uploads a file to Zoology category. He sets a title and attaches a file but he can't set price because he is not allowed to. Anyway, he is also able to upload a demo file.

After uploading he will see his own entry like this:

He is the only who is able to see it because he is the owner but other users won't because the document hasn't been published. He is also able to download.
Now, manager realizes there is a new file and set its state to published.

And now everyone is able to see it.
Then, another user visits the site. He is not required to register. He just sees the file and becomes interested in it.

He has access to dowloading a demo, but for the real file he needs to click on Pay button.

After clicking "Pay" he is redirected to a payment page that will take him to the whole payment process. After he has finally paid he can see the "Download button", and download of course.

At this point should have received an e-mail notifying him about the payment. So, he can log into the site to reclaim his money.

He now has 9 USD in his account and he can claim it.
After he has claimed administrator sees the following in users back-end view.
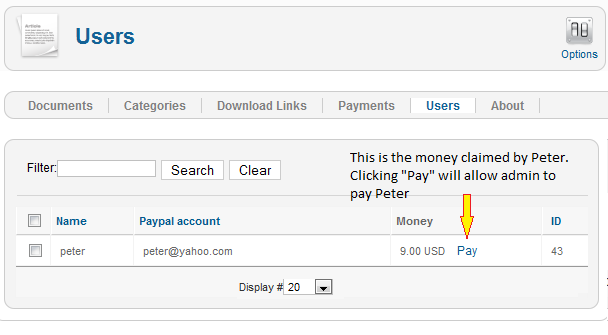
As seen in this picture administrator can see that Peter has claimed 9 USD. He now should hit "Pay" to make a payment to Peter and cancel the debt.
Resuming.
This is just a brief explanation of how the component Digital Market works. I hope it becomes a usefull start. If you have any doubt don't hesitate to contact me or ask in the forum.